
Point Definition
The Point Configuration set during the program setup can be viewed or modified at any time.
How to Manage Point Configuration:
Step 1: Navigate to Configuration and Program Settings in the platform. Go to the Point Definition tab.
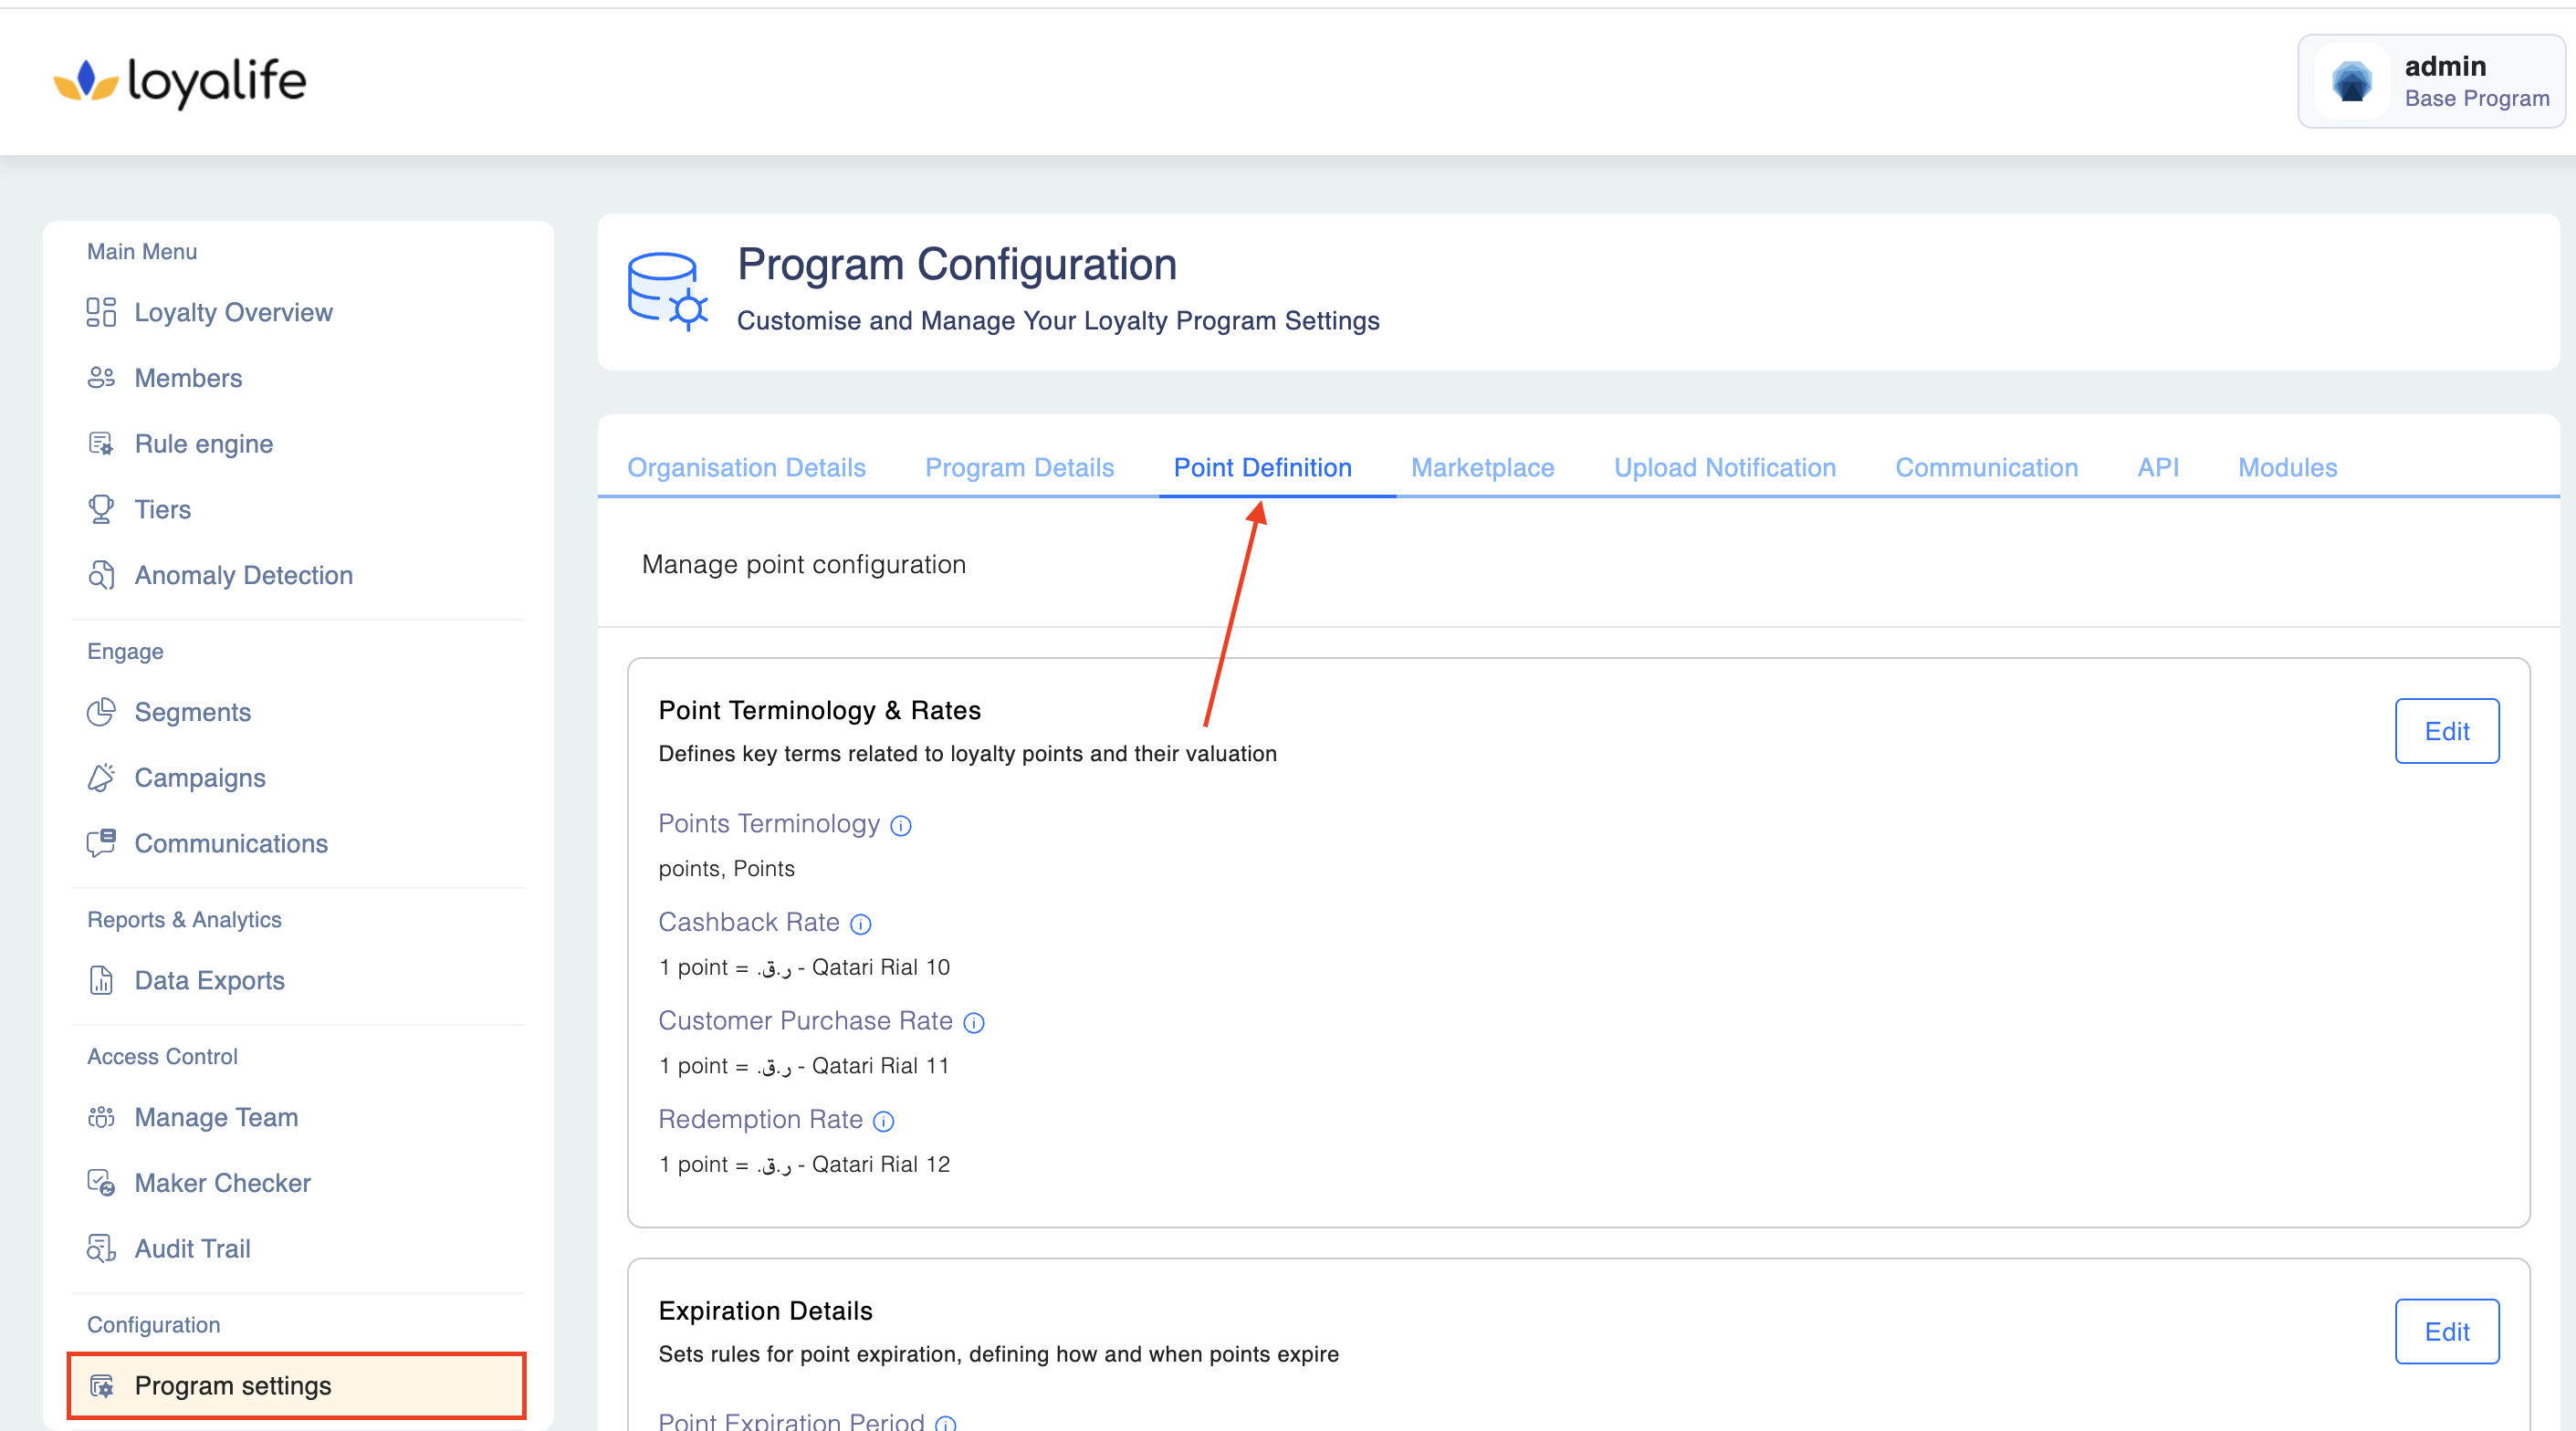
Step 2: Click on the Point Definition tab.
Here you can make the following changes:
2.1 Point Terminology & Rates
2.1.1 Click Edit as shown in the image below.
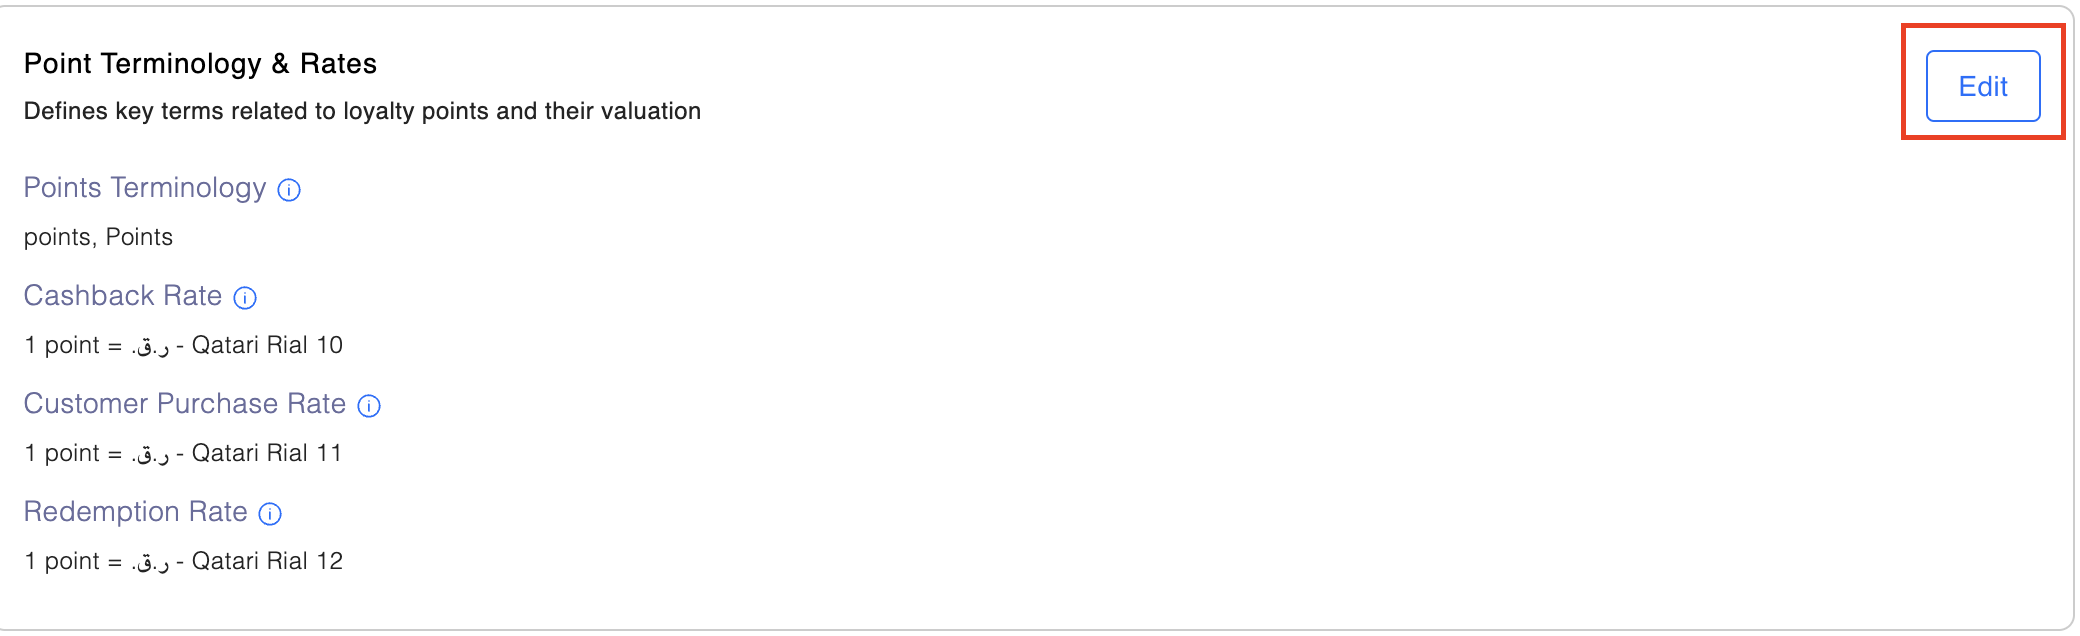
2.1.2 Key Point Configuration Settings:
-
Points Terminology: Define how loyalty points are referred to throughout the platform, including notifications.
- Singular: What a single point is called.
- Plural: What multiple points are called.
-
Points Expiration Schedule (Months):
Set the duration (in months) after which points will expire. -
Point Expiration Period:
Specify when points will expire after the expiration schedule is completed (e.g., annually, monthly, or quarterly). -
Cashback Rate:
Defines the value of a single point in your base currency. This is used when members convert their points into currency for redemption. -
Customer Purchase Rate:
Specifies the monetary value of a single point when members buy points. This helps in determining the total cost of purchased points. -
Redemption Rate:
Determines the conversion rate of currency to points for products and services.- Example: If the redemption rate is 2, an item worth 1 unit of currency will be valued at 2 points for purchase.
-
Maximum Points Accrual Per Member Per Month:
Set a monthly limit on how many points a member can earn from all sources, with the option to allow partial points and block any extra once the limit is reached. Some details on the functionality of Maximum points accrual is as below:
-
The system supports intelligent partial point accrual when members approach their capping limits. For example, if a member has already earned 450 points and attempts to earn 100 additional points with a 500-point capping limit, only 50 points will be credited, maintaining the capping boundary.
-
The platform includes sophisticated handling of negative credit transactions that can free up capping limits:
Example Scenario: Capping limit: 1,000 points Current accrued points: 900 points Negative credit transaction: -500 points Result: Capping limit is freed by 500 points Updated status: 400 points used, 600 points available -
The system implements three distinct capping levels, and points are withheld if any of these capping mechanisms are triggered:
Rule Group Capping: Applies at the rule group level
Product Code Capping: Enforces limits at the product code level Member Capping: Implements individual member-level restrictions
-
-
Enable Abbreviated Numbers:
This setting controls how point values are displayed across the platform.
- When disabled:
Points are shown in the full numeric format (e.g., 10,000). - When enabled:
Points are displayed in an abbreviated format, such as:- K for Thousand (e.g., 10K)
- M for Million (e.g., 1.5M)
- B for Billion (e.g., 2.3B)
This toggle helps improve readability for large numbers.
- When disabled:
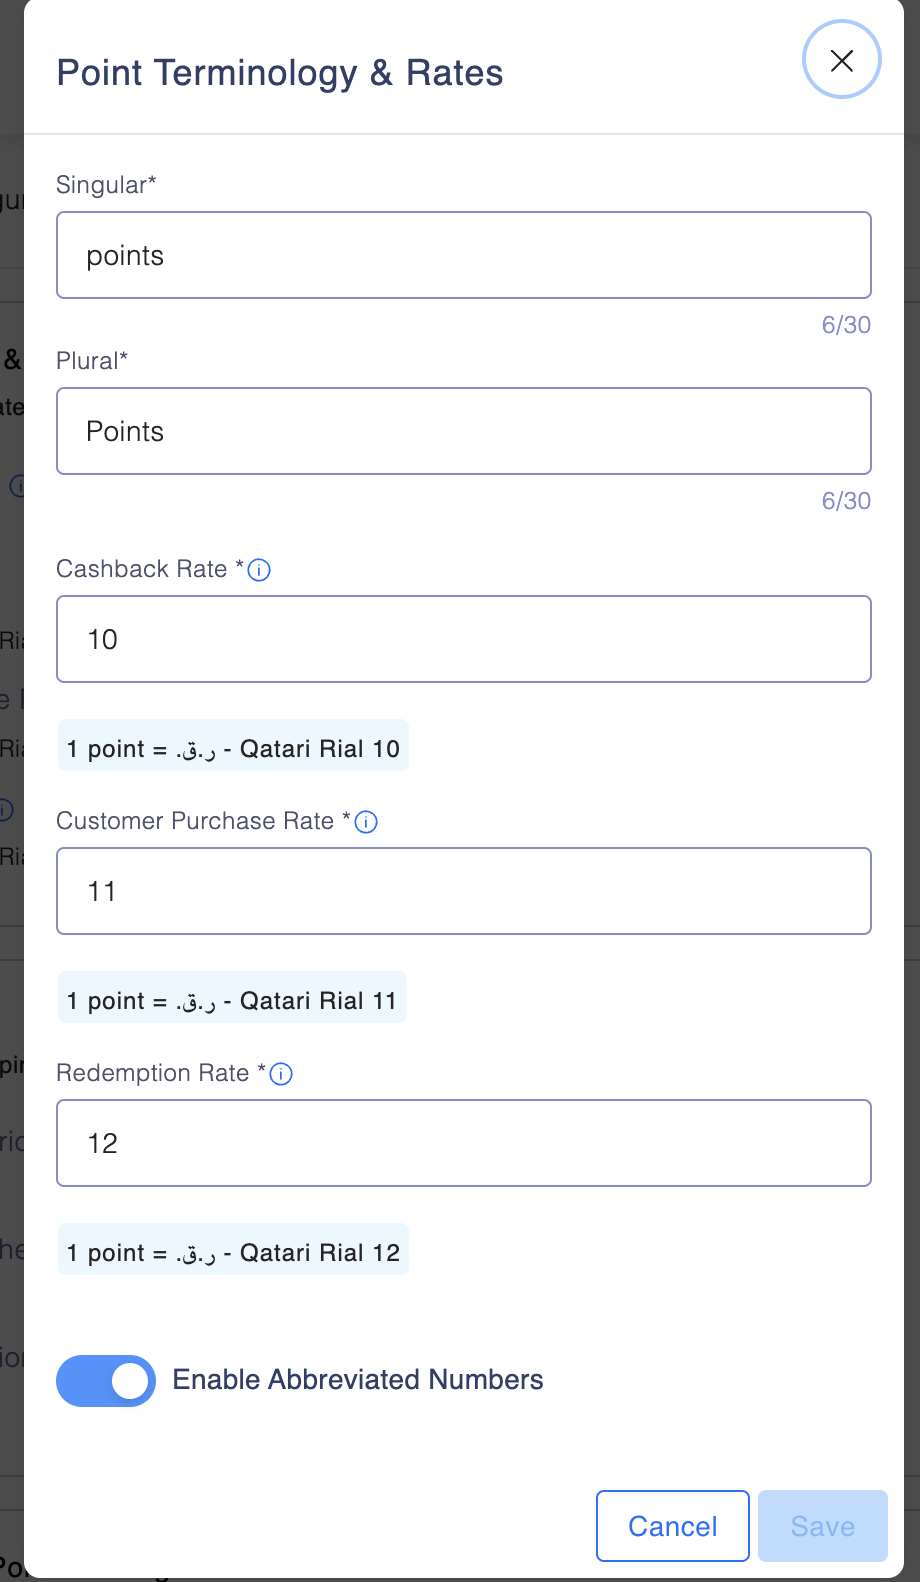
- Add the relevant details and click Save once done.
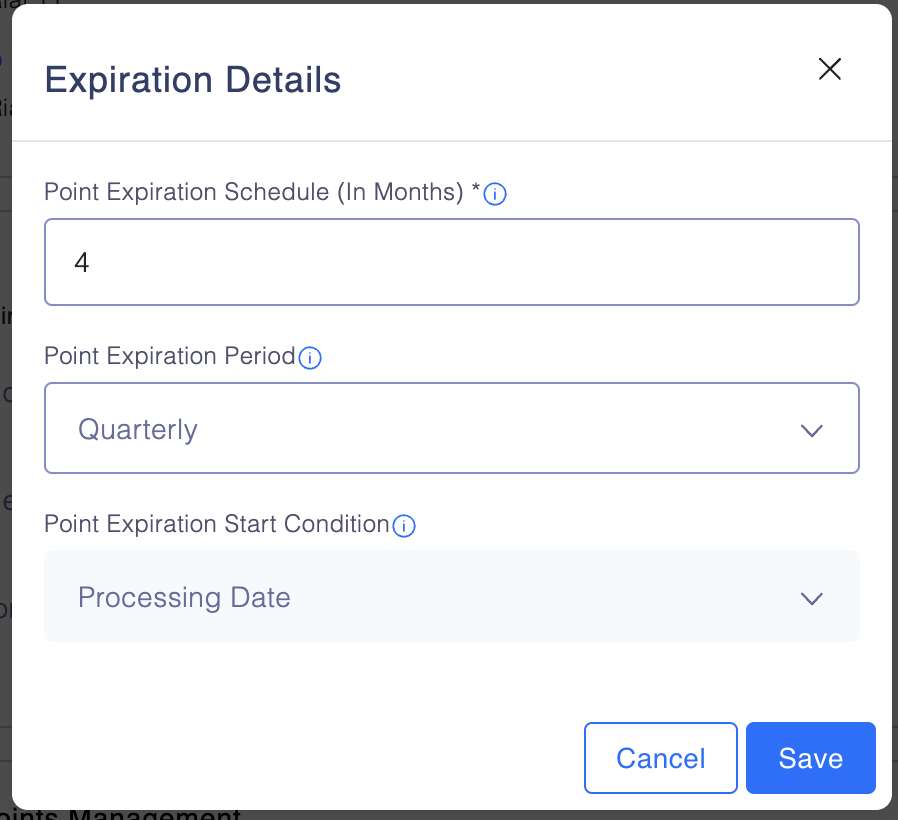
2.2 Expiration Details
This sets rules for point expiration, defining how and when points expire. Click Edit next to the the Expiry Details card.
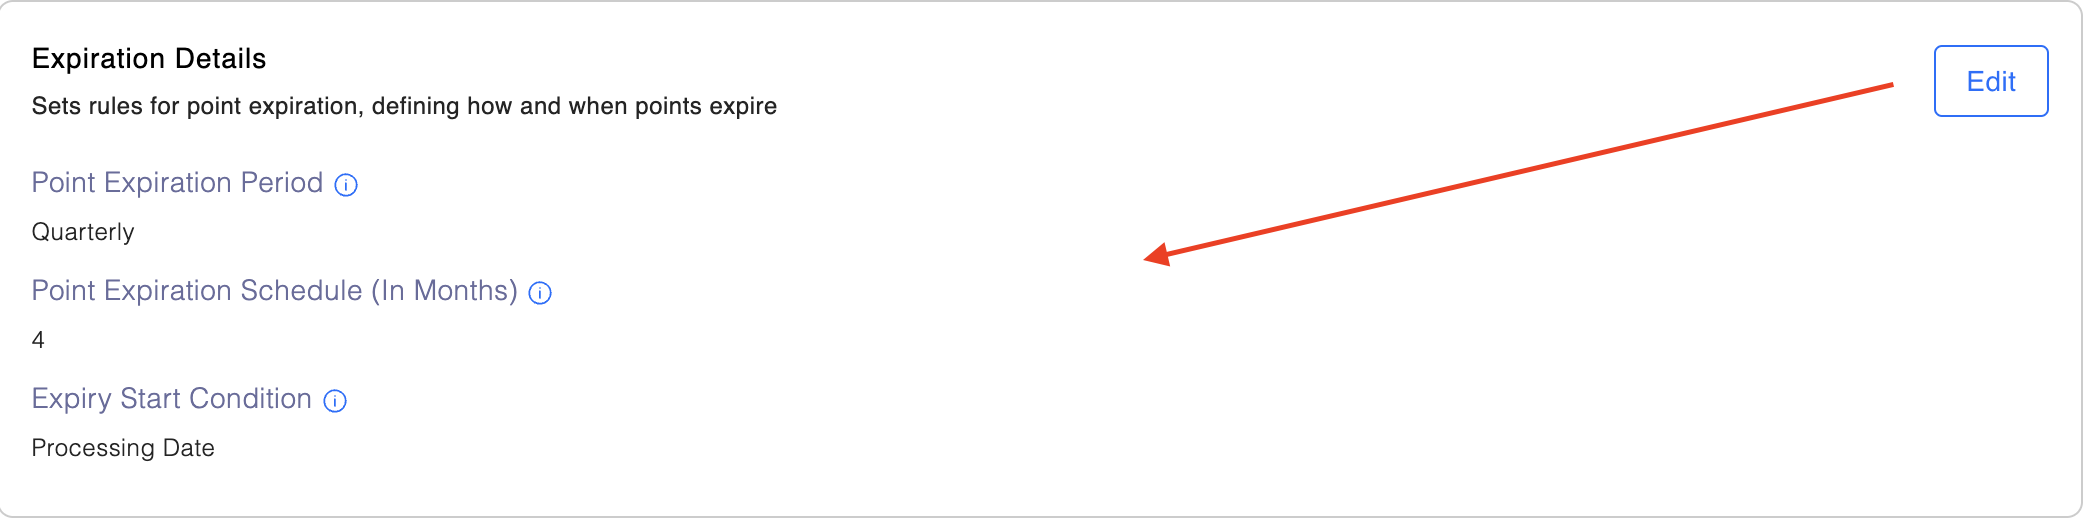
2.2.1 Add the relevant details
- Point Expiration Period: Defines how often expiry is calculated (e.g., Quarterly)
- Expiration Schedule (Months): How many months before unused points expire (e.g., 4 months)
- Expiry Start Condition: When expiry is calculated from (e.g., "Processing Date"). Use the drop-down menu to select the required option.
2.3 Claim and Pending Points Management
Here, you can configure rules for retro claims and manage pending points before they are credited for use. To add details, just toggle the button.

2.3.1 Rules for:
- Retro Claims: Allowing members to claim missing points from past purchases.
- Pending Points: Managing points earned but not yet credited.
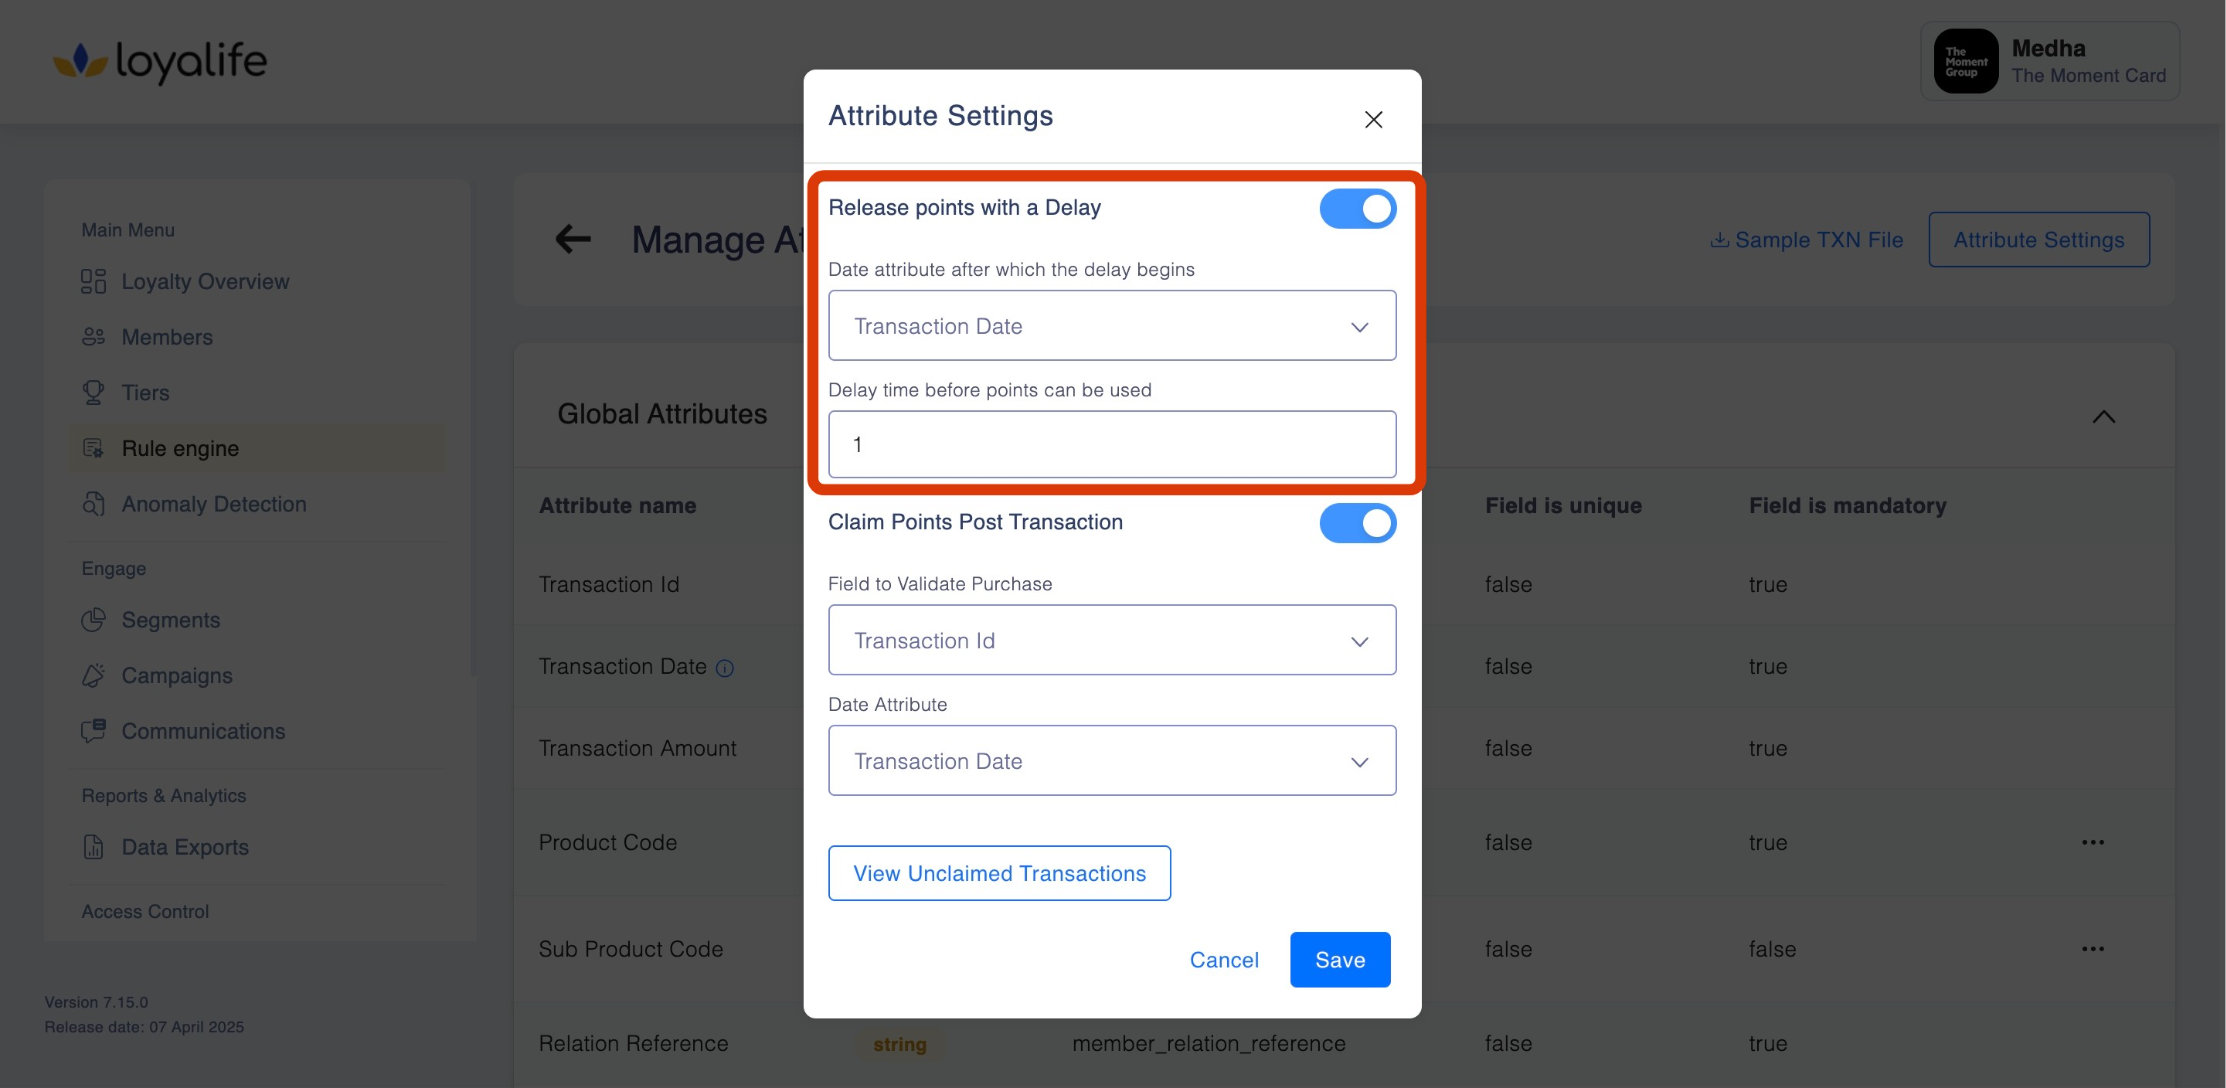
2.3.1.2 Release Points with Delay
This configuration allows you to delay the release (earning) of points after a transaction. Delaying points helps businesses handle return windows, fraud checks, or other conditions before points are made available for redemption.
How It Works?
- A delay timer begins after a specified date attribute.
- Points are released to the member’s account after the delay period ends.
Hows to Configure the following?
- Choose either: Transaction Date or Custom Start Date.
- Delay Time Before Points Are Used: Enter the number of days (e.g., 7 days delay before points are credited).
- Save the rule settings. Points will now be delayed according to this configuration. For Instance: If the Transaction Date: March 1st, 2025 and Delay Time: 7 days. The points will be released on March 8th, 2025.
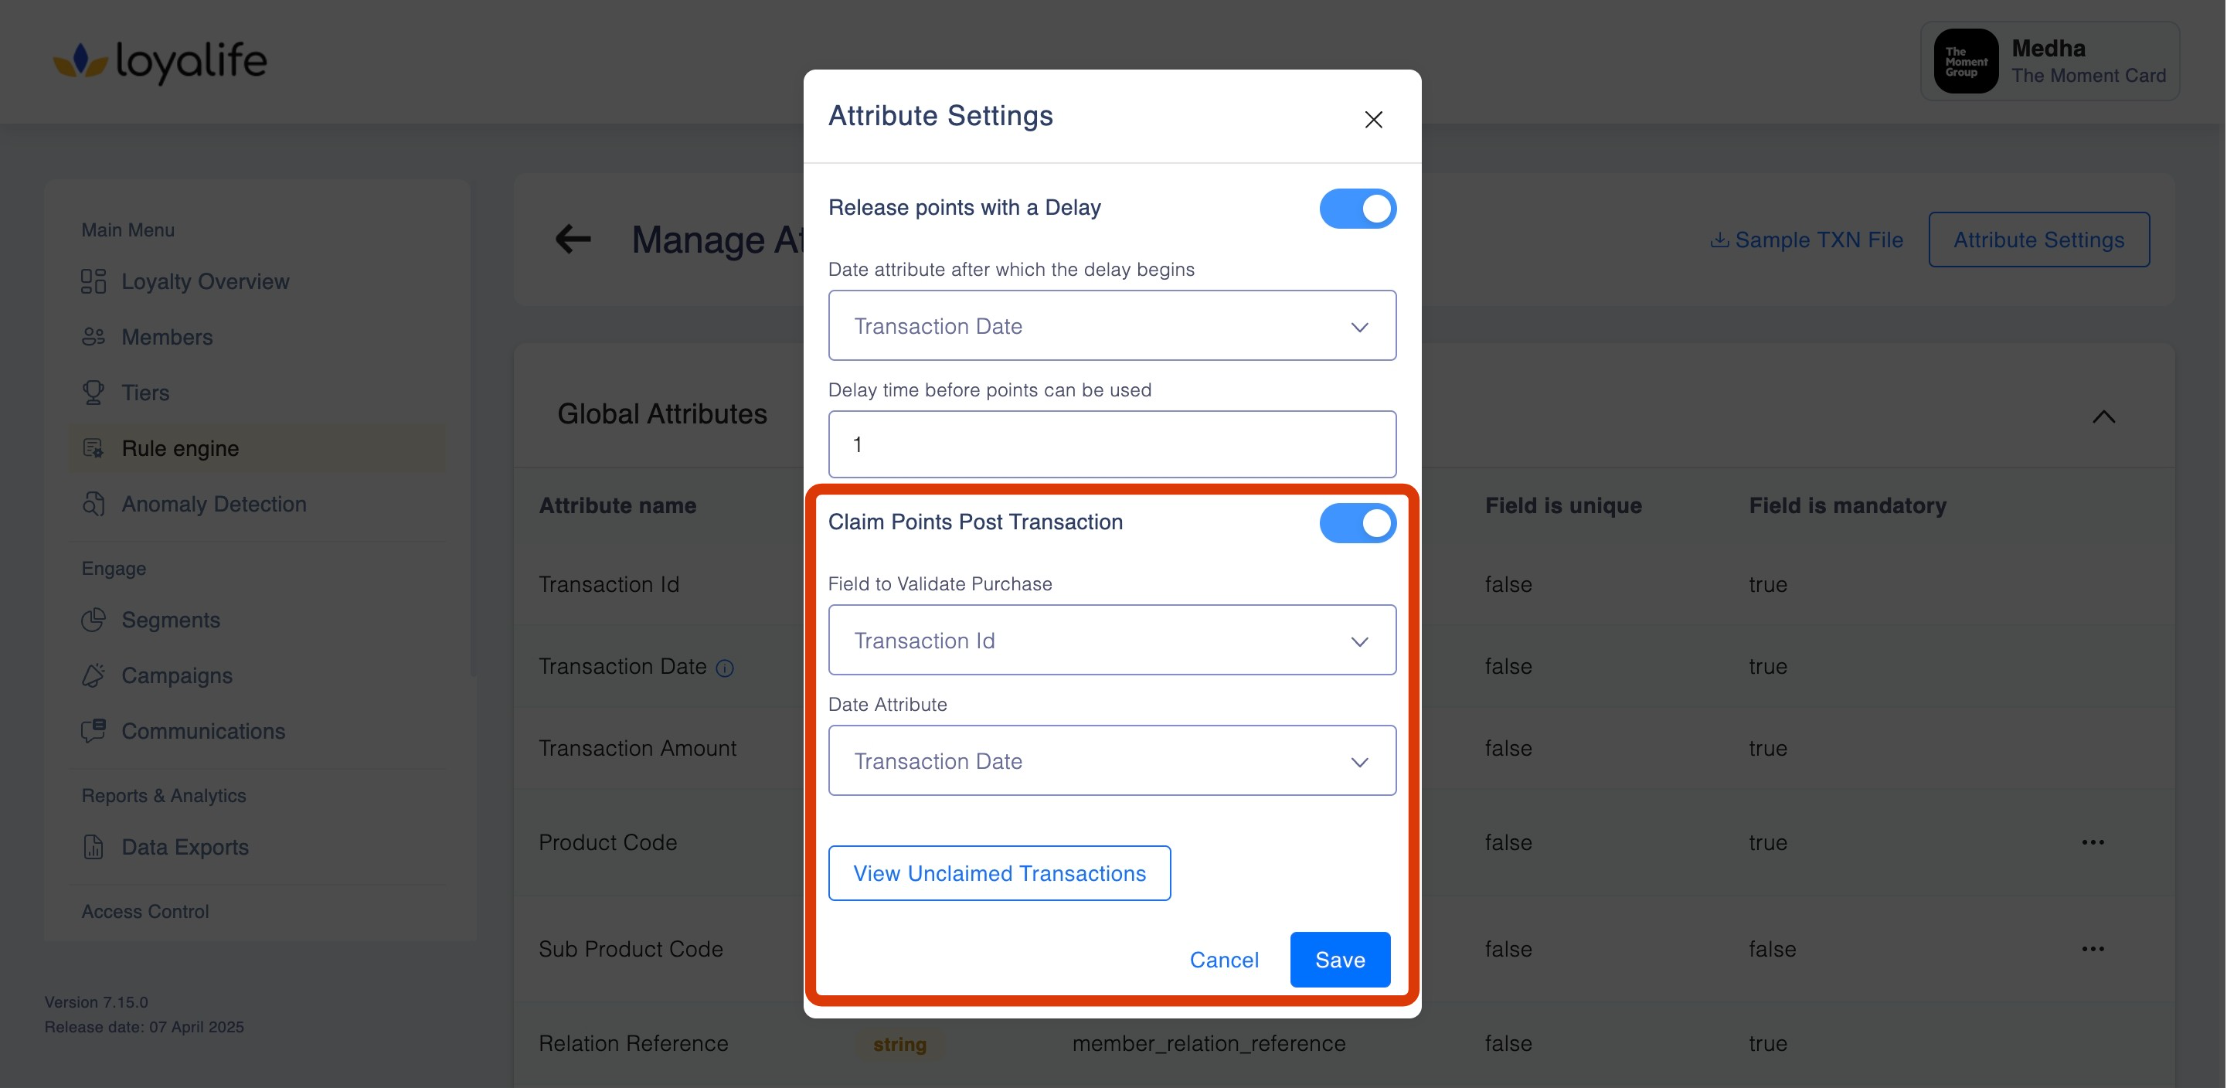
2.3.1.3 Claim Points Post Transaction
This setting allows members to claim points manually for transactions where points were not automatically credited. It requires validating specific transaction fields.
How It Works?
- Members or admins can submit claims for missing points.
- The system validates the claim based on the chosen transaction identifier.
Hows to Configure the following?
-
Field to Validate Purchase: Choose one of the following validation fields:Transaction ID, Product Code or Sub Product Code.
-
Date Attribute: Choose the transaction date reference which can be either Transaction Date or Custom Start Date.
-
Save the configuration. For Instance
- A member submits a claim referencing their Transaction ID.
- The system checks whether this ID has been used before and validates the claim.
- Points are credited if the claim is successful.
2.4 Add Linked Loyalty Program
2.4.1 Enable multi-currency point handling by connecting independent loyalty programs for cross-redemption. Click on Add to enable this.

2.4.2 Add the Linked Loyalty program using the drop-down menu; click Confirm & Proceed once done.

Please note: This is a one time setting and cannot be reverted.
For any questions or feedback reach out to us at [email protected].